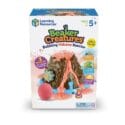
A didactic set for exploring and carrying out experiments with water. Children will develop their understanding of volume, the buoyancy of objects on water, learn how soap bubbles are formed and have immense fun.
Recommended for children over 3 years.
Packaging dimensions: 25.4 × 11.4 × 22.9 cm
Material: plastic
Splashology includes all the tools you need to discover science in uncharted waters: tubes with floating trays, targets that stick to walls or float, flasks, bubble wands and experiments that bring it all together. Get in the water, marine scientists, the Water Lab will keep you entertained whether you're on the beach, in the bath, splashing in the sink or stirring the water in the tray!
Notes for little aquatic scientists (and their parents!): Explore all the tools before delving into the experiments. Fill them with water, put the test tubes in the tray, squirt water with the syringe... you'll soon discover the many functions and fun uses each piece has!
Suggestions for experiments
Bubble fun!
Materials: soapy water or baby shampoo, bubble bars and test tube. Instructions: Prepare the bubble solution: fill approximately 3⁄4 small test tubes with water. Add four squirts of body soap; mix well. It's bubble time! Look at each of the sticks: which one is in the shape of a circle? Dip that stick into the solution and blow some bubbles. What shape are the bubbles? Are they the same shape as the stick? Do the same with the square and triangular rods. Compare the shape of the bubbles using all three rods. Do they have anything in common? They are round! Why are bubbles round? The air trapped in a bubble is a gas, so it is pushed back evenly at each point on the bubble's surface. These forces on the outside and inside of the bubble give the bubble its round shape.
Mixing colours (in the sink)
Accessories: food colouring, syringe, test tubes. Instructions. Add five drops of red food colouring. Cover and shake or stir vigorously to mix the colour. Fill the small tubes half full with water. Add three drops of yellow food colouring to one and three drops of blue food colouring to the other. Shake or stir as before to mix the colours completely. Using a syringe, squirt the red water into the yellow water. Shake to see the new colour! Now mix the red water with the blue water. Shake again to see the new colour! Were you surprised to see how easy it was to make new colours? The primary colours (red, yellow, blue) are mixed to make secondary colours like orange and purple in this experiment. What do you think would happen if blue and yellow were mixed? Try it and see! The world is your rainbow.
Sink the vessel!
Materials: tray, test tubes. Instructions: We know that the tray floats (like a raft) on water ... but what would it take to make it sink? Let's turn the raft into a submarine! First, fill each test tube with water and place them in the tray in a little-big-little pattern. Does it still float? Yes? OK, it's time to try something different. What if we shift the balance of weight? Throw away the small tubes. The large tube should be filled to the 3⁄4 line, but place it at one end, not in the middle of the tray. Does this make the tray less stable? Does it tilt or sink into the water at all? What happens if the tray takes on water now that we have tried to change the weight balance? Remove the tubes. Tilt one end of the tray slightly so that some of the water flows over the edge. Release. Does it still float? Finally, submerge the tray and push it to the bottom so that it is completely under water. Lower it and see if it floats back to the top. Does it tip over? This experiment is mainly about buoyancy, or the ability of an object to float. When you add weight to an object in the form of water or additional objects, you increase its density. And when an object has a greater density than water, it will sink. Remember this the next time you are splashing around with your favourite bath toy.
Fill the tube!
Materials: tray, test tubes, syringe. Instructions. Place the tray on the surface of the water. Look at the test tubes and compare their sizes. Predict: how many small test tubes will be needed to fill a large test tube? Try it! Dip the syringe in water, fill it and then squirt water into one of the small tubes until it is full. Fill the large tube with water. How much have you filled it? Do the same with the syringe and the other small tube. Is the large tube now filled to the top? Did you predict correctly? This experiment shows that a whole can be made up of parts of different sizes. At first glance you might not think that two small tubes can fill one large tube, but appearances can be deceiving. Now you know: 1 small test tube = ½ of a large test tube.
Hit the target!
Accessories: syringe, foam float. Instructions: Place one of the foam floats on the water close to you and the other one a little further away. Dip the syringe into the water and pull the handle back to fill the chamber. Estimate how hard you will need to push the handle of the syringe to hit each water target. When you're ready, aim and shoot! You may need to refill the syringe after the first attempt. Keep trying until you hit the target! Try again, but this time stick the targets to the wall (to make the targets stick, spray some water on the wall and the targets). You can place the targets on adjacent walls of the bath, side to side, up and down, or in a completely new formation - it's up to you! What was different about trying to hit the target when it was placed horizontally (on the water) and when it was placed vertically (on the wall)? Did the water travel differently? The main difference is air pressure. If you press the handle harder, you create more air pressure through the chamber, resulting in a stronger jet of water. You have made a difference!
Layers of fun
Instructions: place the tubes in the tray and place it on the water. Put the funnel in a large test tube. Pour water through the funnel until the tube is half full. Take your favourite shampoo and squeeze a good amount through the funnel. Does the shampoo mix with the water or the layer on top? Remove the funnel. Then have the parent squeeze a dollop of foaming shaving cream directly onto the water. What happened this time? Because the foam is so light and has less density than water, it floats on top. Try this one: Put the contents of the tube into a wide-mouth flask. Add a little water and shaving cream for good measure. Now dip the syringe into the flask and fill the chamber. Can you push any of this foamy, soapy, watery mixture through the nozzle, or is it too thick?
Follow the flow!
Accessories: 2 beakers, flasks, 3 test tubes, 5 lids. Instructions : Collect all five lids, plus two flasks and three test tubes. Do you think the water flows equally well through all the lids? Do any of the lids completely block the flow of water? Check with the organisation of the pouring competition! Fill each of the containers with water and cover them with appropriately sized lids (two are only suitable for the flasks!). One by one, try to pour the water out of each container. Think about your answers to the questions in Step 2 above. Did you guess correctly? You can see that the water only flows as far as its container will allow. This means that water is flexible. Trying to pour water through a stopper is like trying to let water through a blocked pipe - the water has nowhere to go. But water can flow freely in open spaces such as streams and oceans, as long as there are no obstructions (such as dams).
LER2945
| Age | 4-6 years, 6-8 years |
|---|
If you have placed an order as a guest, you will receive an email with a link to submit a review within a few days of purchase.

If you are not satisfied with the product or want to exchange it, you have 14 days.
More about returns and exchangesProducts in stock are shipped every day. Personal pickup is possible.
More about deliveryonline with credit card, Paypal, bank transfer and cash on delivery.
More about our Terms and Conditions


Katja P.,
The aids are well made and suitable for the youngest children. Fun and educational suggestions for experiments are included (in addition to the instructions for carrying out the experiment, there is also an explanation of why the outcome of the experiment is the way it is).
I definitely recommend this product.